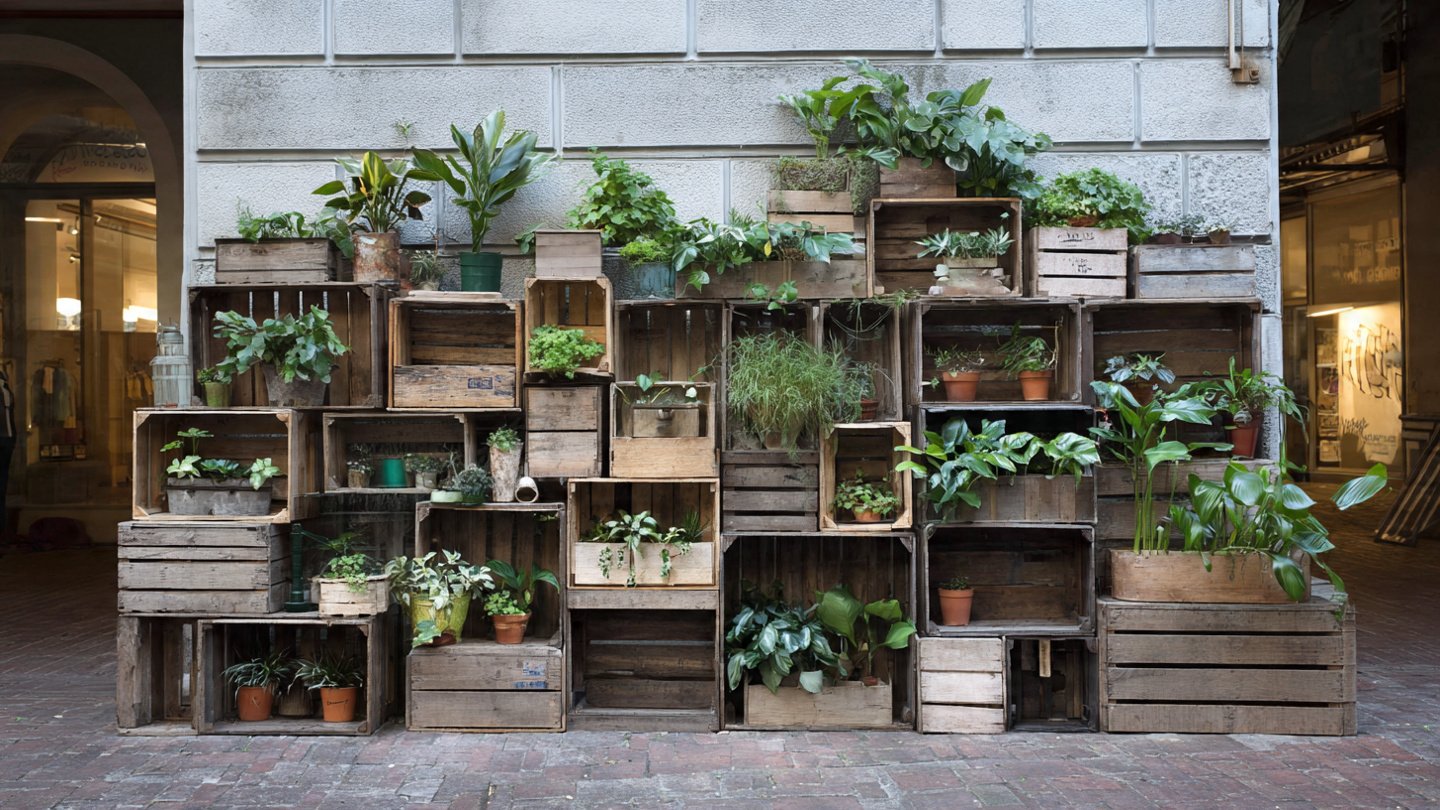
Wooden crates are often viewed as mere storage solutions, but they can be so much more. With a bit of creativity and elbow grease, these unassuming boxes can be transformed into a stunning modular plant wall that adds both aesthetics and greenery to any space. Not only does this project contribute to environmental sustainability by repurposing materials, but it also enhances indoor air quality and brings nature closer to home. Here’s a step-by-step guide on how you can transform old wooden crates into a beautiful modular plant wall.
Materials Needed
Before you delve into the project, gather the following materials:
Latest Posts
- OnePlus Turbo 6V 5G Launched – for Gamers with 9000mAh Battery, 220MP Camera & Snapdragon 8s Gen 4
- Realme GT 8 Pro Officially Launched – 200MP Camera, 7,000mAh Battery and Snapdragon 8 Elite
- OPPO K13 Turbo 5G Launched – 7,000mAh Battery, 50MP Camera and High-Performance Chipset
- Realme 17 Pro 5G Unveiled – IP69K Certified, 200MP Camera and Massive 8600mAh Battery
- Vivo Premium Smartphone Launched – 200MP Camera, 90W Fast Charging and 16GB RAM
- POCO F8 Ultra Launched – Snapdragon Flagship Power, Bose Audio and Huge Battery
- POCO F8 Ultra Launched – Snapdragon Flagship Power, Bose Audio and Huge Battery
- OnePlus Nord 3 5G Launched – 120Hz AMOLED Display, 50MP Camera and 5,000mAh Battery
- OnePlus Nord CE4 Launched – Powerful Snapdragon 7 Gen 3, 50MP Camera and Long-Lasting Battery
- OnePlus Smartphone Revealed – Premium 5G Smartphone with 200MP Camera, 24GB RAM and 100W Fast Charging
- Old wooden crates (varying sizes for visual interest)
- Screws and brackets (for stability)
- Wood sealant or paint (optional, for aesthetic purposes)
- Landscape fabric (to line the crates)
- Soil (potting mix is ideal)
- Variety of plants (succulents, herbs, or flowers)
- Drill and screwdriver
- Measuring tape
- Level (to ensure even placement)

Step-by-Step Guide to Creating Your Plant Wall
Step 1: Choose Your Crates
Select crates that are sturdy, clean, and in good condition. Consider using crates of various sizes for a more dynamic wall. Ensure there are no harmful chemicals or finishes on the wood that could leach into the soil.
Step 2: Prepare the Crates
Clean the crates thoroughly to remove any dust, dirt, or residual materials. If desired, you can sand down rough spots to prevent splinters.
Step 3: Apply Sealant or Paint

If you want to enhance the appearance of your crates, consider applying a wood sealant or paint. This step is optional but can help protect the wood from moisture and extend its lifespan.
Step 4: Arrange the Crates
Design the layout of your plant wall. You can create a simple vertical stack or a more complex design by interlocking and overlapping crates. Use a measuring tape and a level to ensure that everything is properly aligned.
Step 5: Secure the Crates
Once you’re happy with the arrangement, secure the crates together using screws and brackets for added stability. This is especially important if you are stacking crates vertically.
Step 6: Line the Crates
Line the inside of each crate with landscape fabric to prevent soil from falling through while allowing excess water to drain. Cut the fabric to size and staple or pin it in place.
Step 7: Fill with Soil

Fill each crate with potting mix, leaving enough room for planting. Be sure to pack the soil lightly to avoid it settling too much when watered.
Step 8: Plant Your Greens
Choose plants that suit your space and preference. If you’re positioning your plant wall indoors, consider plants that thrive in low light, such as pothos or snake plants. For outdoor walls, a mix of herbs, flowers, and succulents can be visually appealing and aromatic.
Step 9: Watering and Maintenance
Once your plants are in place, water them thoroughly without saturating the soil. Regular maintenance will involve checking for dead leaves, ensuring proper drainage, and keeping an eye out for pests.
Design Ideas for Your Plant Wall
The plant wall you create could be functional or purely decorative. Here are a few design ideas to inspire you:
- Herb Garden: Transform your modular wall into a vertical herb garden for your kitchen. Use crates to hold your everyday cooking herbs like basil, thyme, and cilantro.
- Succulent Display: Arrange small succulents in shallow crates for a low-maintenance and eye-catching display.
- Flower Arrangement: Use colorful annuals and perennials to create a vibrant visual landscape.
- Combo Crate Wall: Combine different sizes and orientations of crates for a more artistic look—some stacked horizontally and others vertically.

Conclusion
Creating a modular plant wall using old wooden crates is an enjoyable, sustainable project that can add life and character to any space. This initiative not only promotes recycling but also fosters a deeper connection with nature. With careful planning, creativity, and consistent maintenance, your plant wall will thrive for years to come, providing not just beauty but also a refreshing atmosphere.
FAQs
A: It depends on the location (indoors or outdoors). For indoors, consider low-light plants like pothos, snake plants, or peace lilies. For outdoors, herbs, succulents, and flowering plants are great options.

A: Make sure to use crates that are free from harmful chemicals or finishes. If you’re unsure, you can line the inside with landscape fabric to create a barrier between the wood and the soil.
A: Most plants thrive with about 6 hours of indirect sunlight. However, it’s crucial to choose plants suitable for the amount of light available in their placement area.
A: Absolutely! You can repurpose pallets, metal containers, or even plastic bins, depending on your style preferences.
A: Watering frequency will depend on the plant type and environmental conditions, but generally, allowing the soil to dry slightly between waterings is ideal. Always check the moisture level first.